Pages

Tuesday, September 17, 2013

Dollhouse for your Dollhouse

Every miniature enthusiast dreams of having a dollhouse--or several of them! I know I do! However, a lack of space and a lack of money have postponed that particular pursuit for the time being. To fulfill my dollhouse dreams, I've been collecting tiny dollhouses off and on for some time. I was inspired after finding a link to the blog:  http://raumfuerraum.blogspot.com/ on Pinterest. She makes the cutest little dollhouses for her dollhouses and room boxes. I also stumbled onto a Flickr group called "dollhouse for a dollhouse" which you can see or join here:  http://www.flickr.com/photos/8836406@N08/6992021847/in/pool-1223652@N25/

My previous blog post followed the progress of the first tiny house I've made. The rest of my houses have been purchased largely on ebay. There are some amazing artisans who make very detailed tiny houses, but they are out of my price range (although they're worth every penny considering the time and talent it takes to make them.) Some of mine are ornaments, toys, and model railroad diorama houses. I thought I would share some of my favorite finds. They are a variety of scales-1:144th, N scale, HO scale, etc. If you share my enthusiasm for these tiny houses, feel free to post them on my facebook page. It's set up so that you can post your own photos and links. https://www.facebook.com/pages/Miniatures-from-Avalon-Imagination-by-Ronda-Vallejo/184671294945212

This pink house is O scale.


The middle house is HO scale. The rest are Hallmark ornaments.

This HO scale house has some great little details, like the little water feature, awnings, and patio umbrella.

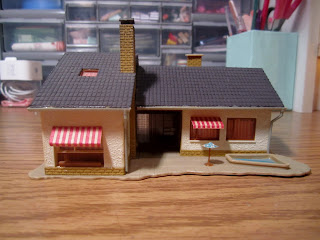
I placed a light behind it so you can see that it has a little courtyard. It has patio doors and glass block.


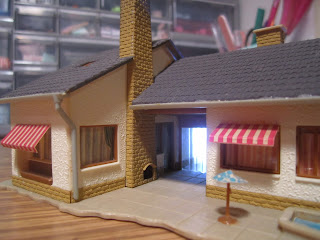
I love the little balcony and the curtains in the windows.


The only thing I'm not fond of is the color of the house. I think I will repaint it eventually.


Here is a previous photo of the houses that I had at the time. 

I just got the turquoise and grey Bachman Contemorary house today. I originally planned to repaint the yellow one, but it was so detailed with so many windows, I was a bit intimidated. I love the new one! I also found the little mid-century gas station recently. The pool set is HO scale.

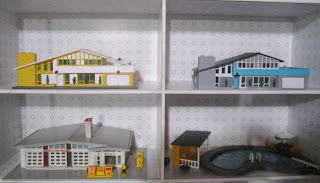
I didn't like the original color of these houses at all, so I've started repainting them. 


Tuesday, September 10, 2013

Butterfly style mid-century modern pool house:  I started with a basic frame. It looked a bit like a gas station at this point, and I wasn't optimistic. If I would have known how much time I'd end up putting into the project, I would have taken more care to get the pieces plum. ;)


I painted the roof and trim and taped off the front walk. 


To make a planter, I used three pieces of wood, one long and two short for the sides. I used "quick" dry glue to put it together.

A little more glue...
 ...and I placed it in the front between the windows.

We drink a lot of iced tea at our house, so after I brewed tea a couple of times, I saved the tea leaves, dried them out, and saved them to use as dirt or mulch.

I filled the planter with clear gel tacky glue, then sprinkled the tea leaves liberally on top. I added three little pink bushes. 

For the lawn, I painted the glue on the surface, and used diorama grass powder. I had that stuff everywhere!


For the tree, I drilled a small hole in the wood, added a dollop (and now I'm singing that annoying sour cream jingle in my head.) of clear glue, placed a little diorama tree in the hole, and then added tea leaves.


For the decorative screens, I used plastic canvas.

The sofa is made from painted pieces of balsa wood, and the pillow is craft foam. The planter is polymer clay with cut-off pins for legs. The real gem is the little dart-style boomerang table with hairpin legs that my daughter made for me. She is very good at extremely small stuff! Thank-you, Kenna. The light fixtures are sewing pins. 

I cut a small nail down, and inserted it into the bottom of a wood craft circle, gave it a coat of paint, and viola' -- a table. 

The slide was simple - a little rectangle of polymer clay twisted and a toothpick ladder. I made the lounge chairs with plastic canvas and craft foam. I used the same basic construction process for the dinette chairs. 

I cut single squares of plastic canvas.

I used the "quick" dry tacky glue to put them together. 

I cut tiny squares of craft foam for cushions.

I made things simple by using a Sharpie to give them some color.


Then I attached U shaped pieces to the bottom. 


I decided to do something productive like work out a bit while waiting for the not-so-quick quick dry glue to dry. At the rate glue dries, I should look like Charles Atlas by next year. 

Then I snipped off the center portion of the U to make four legs.

I used the smallest bead I had for a bowl, and little plastic pieces for glasses.